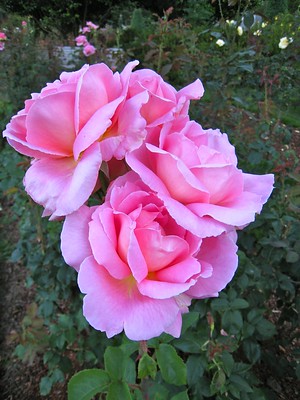
 Unlike Day 1, which for many was a new introduction, Day 2 of the advent calendar features two familiar favorites that can be bought nearly anywhere. Elise Hutchings, our universally beloved Utah Rose Society president has one of these beauties that originally came from her mother’s yard. The first time I smelled it I was so jealous with envy; I knew I had to have it in my own collection. Tiffany. Patented in 1954 by Robert V. Lindquist. Tiffany is a masterpiece in color, flowing through a unique mixture of pink, yellow, and occasionally white petals with each temperature change. Not only is color noteworthy, but the fragrance, mmmmm. It fits firmly in the fruity category, with a later note of citrus. Ralph by Ralph Lauren is a comparable perfume. It is in my ten favorite cultivars. Before I get into the 1965 winner; a brief sidenote: I am an idiot. I often get impatient, and if a certain bush doesn’t blow me away, I get rid of it. And then when I see it in someone else’s garden a year later, normally Betty and Ken Langeberg’s, I realize I actually want it. This is what happened when I first bought Chrysler Imperial. I ended up paying double the next season. Chrysler Imperial. Patented in 1953 by Dr. Walter E. Lammert’s, it’s the classic red rose. It also has beautifully long canes that make great cut roses. It has the typical 6-8 week bloom cycle of a hybrid tea, so it’s not as floriferous as other cultivars. Fragrance-wise I describe Chrysler Imperial as a complex, dark damask. It fits in the Floral family but has a musk nuance that grows the more you smell it. Roses De Chloé by Chloé is a complimentary fragrance. 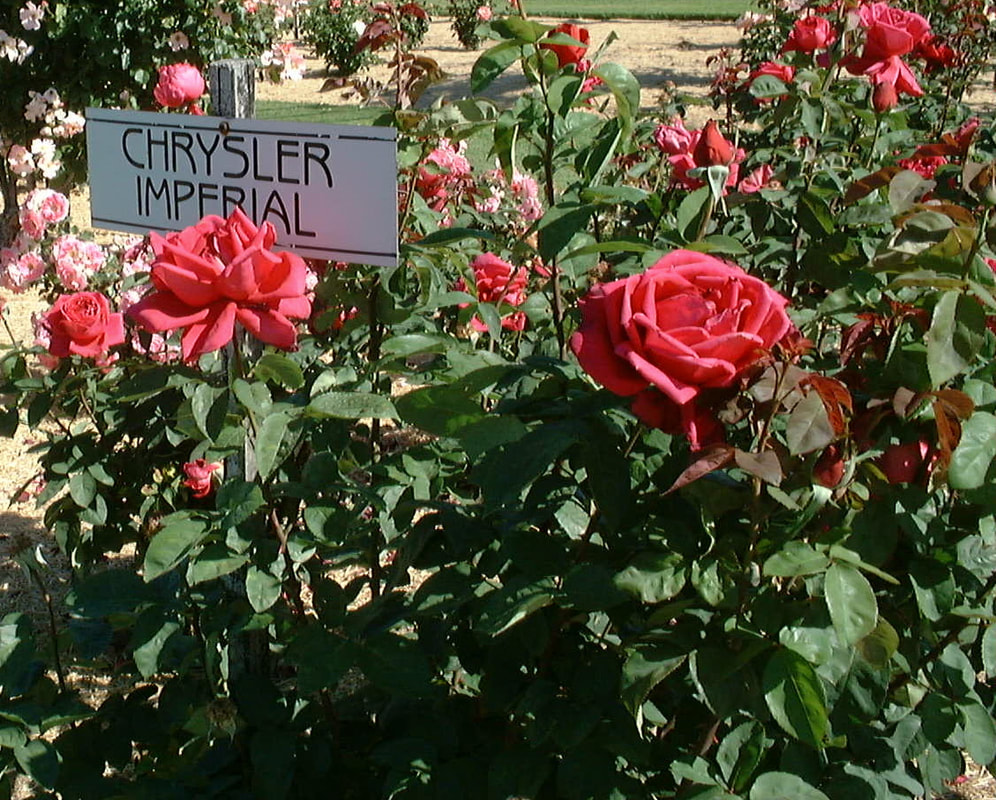
3 Comments
 The first Gamble medal winner is a cultivar that few know today. But back in 1961, it was the fragrant favorite. Its decline in popularity is surprising given that the rose had been around for twenty-six years before receiving the medal; hybridized before 1935 by William J.H. Kordes, the scion of the Kordes breeding dynasty. So what is the first winner of the James Alexander Gamble Fragrance Award? Crimson Glory. Its red and purple blooms resemble the modern favorite Oklahoma. And while it is more susceptible to diseases like mildew and black spot, unlike Oklahoma it’s cold hardy down to zone 4b. The fragrance fits nicely into the floral oriental category, with notes of damask and clove. A perfume from the same category is Narciso Rodriguez for Her. Classic and warm. A friend from HelpMeFind, Nastarana, informed me that the name comes from a poem by Robert Burns: “A ROSE-BUD by my early walk, Adown a corn-enclosed bawk, Sae gently bent its thorny stalk, All on a dewy morning. Ere twice the shades o' dawn are fled, In a' its crimson glory spread, And drooping rich the dewy head, It scents the early morning.”  There is no standardized way to describe rose fragrance. Some use their own private scales, others hire “noses” to smell their roses, and still others are nose blind from Covid. My sister tells me I have the nose of a pregnant woman. If there is a dirty dishtowel two houses over I am sure to identify it. I like to use the Fragrance Wheel developed by Michael Edwards. Mr. Edwards developed this as a tool for perfume sellers and developers to discuss their scents. 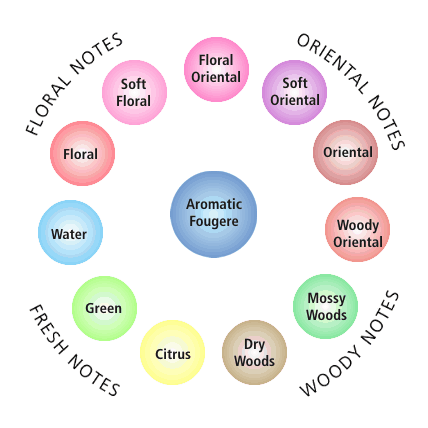 Although I don’t use the aromatic fougere. Fougere is typically masculine while chypre is typically feminine. The description really isn’t needed in roses as no one wants to buy only manly-smelling roses or lady-smelling roses. As old Gerty said "a rose is a rose is a rose".
If you want more information about the fragrance wheel please visit https://www.fragrancesoftheworld.com/FragranceWheel 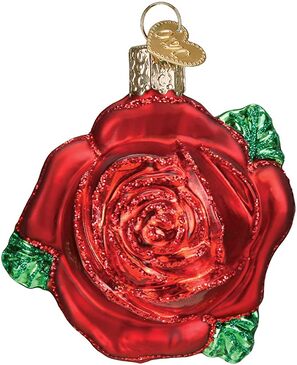 Sadly, this year for Christmas I will not getting any live roses. The joys of living in a 7a climate.
But while my beauties are sleeping, I’m going to give the gift of fragrance! That’s right over the next twelve days y’all are getting a Fragrant Rose Advent Calendar!! And what’s behind each little cardboard slot? Well, they’re cultivars that have received the James Alexander Gamble Fragrance Medal, of course. The James Gamble Fragrance Medal is of particular importance this year, because it was actually awarded. The ARS Prizes and Awards Committee award doesn’t award it every year. In fact, during 1986 and 1997 there was an eleven-year gap. The Gamble Medal is only given when a cultivar is deemed worthy. The only criteria is each rose must have a at least a 7.5 in Handbook for Selecting Roses. There are 28 cultivars to make it through in 12 days. So, stop by the Rosette tomorrow when the countdown starts. Please see the next post the Fragrance Wheel to begin. If a rose is unprotected it can heave out of the ground with the roller coaster of thawing and freezing temperatures. This is why timing is crucial as to when to take off the winter protection. A tip is to wait for the fruit trees to bud out. Spring pruning can then begin as the growing buds begin to swell and appear on the cane. For Zones 1-7 this is usually in April. For now, spring seems so far way, like a dream! Meanwhile, enjoy the decorative rose hips that come along in the fall season!
Before you begin, it is best to clean the ground around the base of the rose of dead leaves and weeds. Pests and disease can over winter in the dead leaves and pose a threat to the new growth of the rose the following spring. So to begin: 1. Put your choice of mulch around the base of the plant up to 12” on the bush. Good mulches are: oak leaves, bark, pine straw, wood chips, soil pep. 2. Do not take the soil around the rose to pile up onto it. You may take soil from another part of the yard, or use a denser mulch such as compost. It is also appropriate to use a mixture of both soil and soil pep, or compost. 3. Remember that snow is also a great winter protection. If you get a lot of snow then you may not need to add protection; if you do not, then you need to add some. 4. If you decide to use oak leaves (maple leaves get too mushy when wet), you may build a cage out of chicken wire to put around the rose and then fill with leaves up to two feet tall. Or you may cover your complete garden with leaves. If you get a lot of wind, they may not stick around! 5. If you live in the mountains in Utah, the temperatures get a lot colder. A solid curtain of fabric, or concrete blanket can be put around the roses, or on top of them, if you first cut the canes down to 10-12” so the curtain does not break them. 6. Potted roses should be put in the garage or basement, even if unheated. The temperature should be 20-40 degrees. Water thoroughly when you first bring them in. Spray with a fungicide. Keep moist just lightly; watering once a month is enough, one or two cups of water is enough. Raise off the floor. They should be placed on an inside wall, and not in a drafty area. 7. Tree roses can be burlapped; wrap burlap around a pruned rose (no long canes) with twine, fill with leaves, and tie at the top. 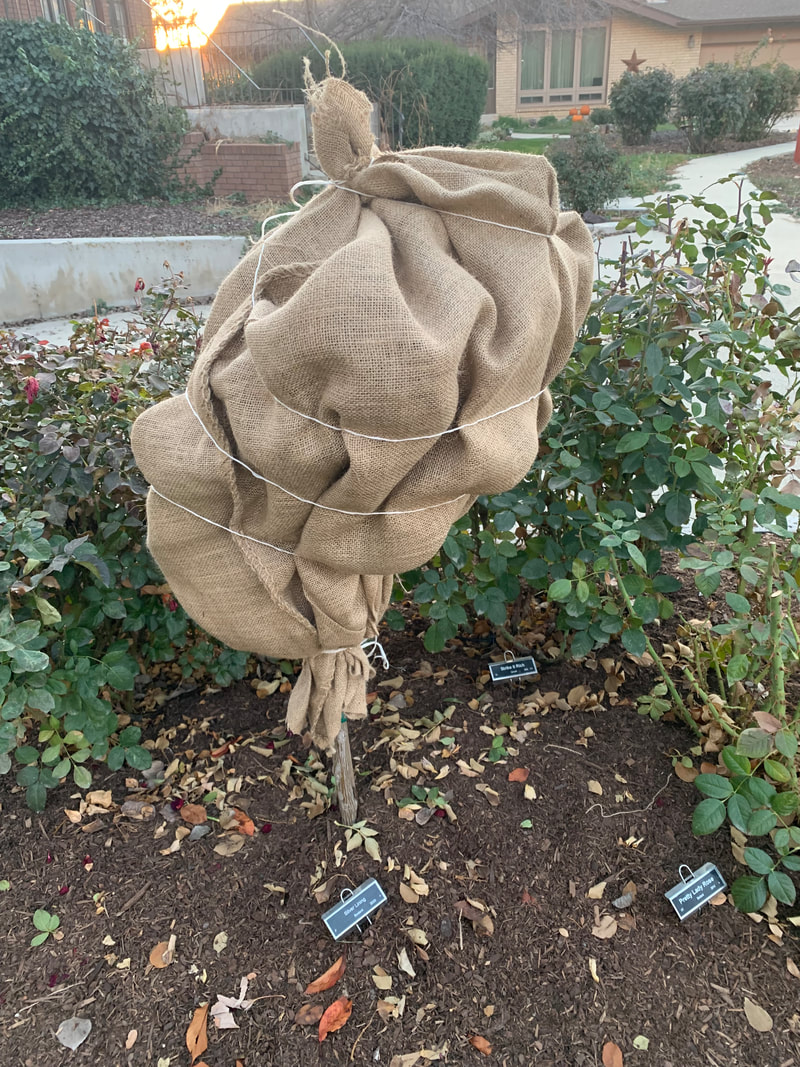 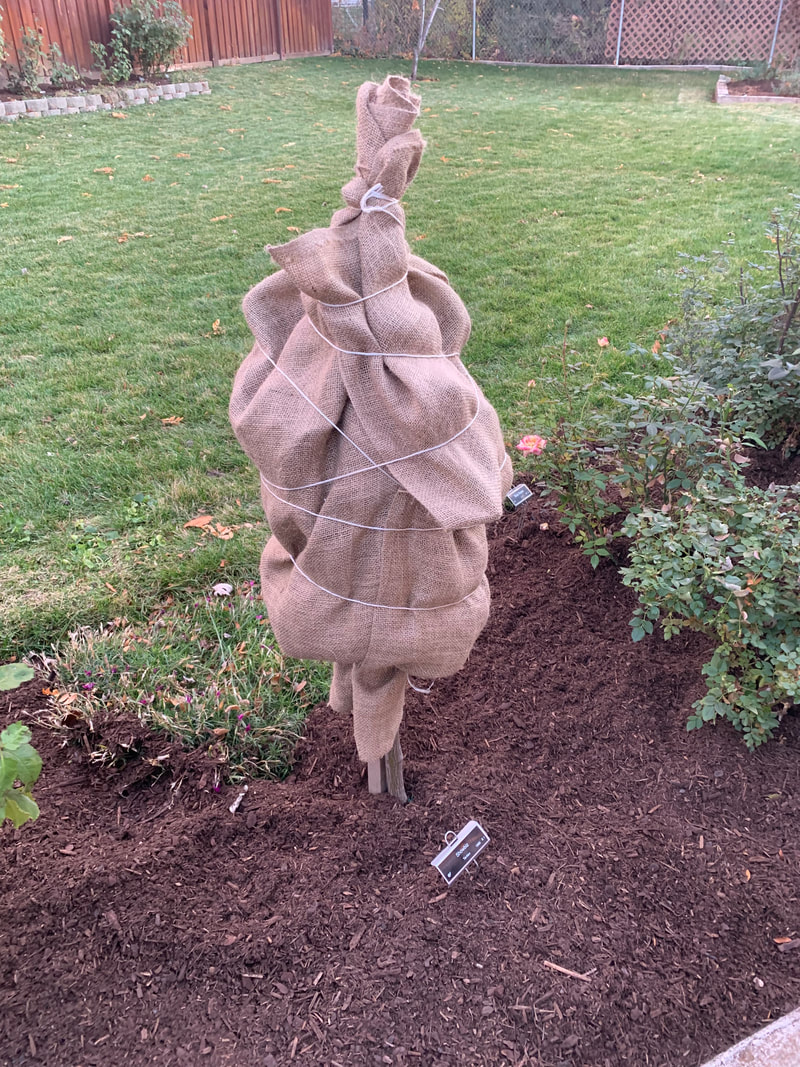 To find your Cold Hardiness Zone, go to https://planthardiness.ars.usda.gov and enter your zipcode. Protect the following roses if you live in Zone 6 or lower (or colder): hybrid tea, floribunda, grandiflora, miniature, miniflora, climbers, tree roses, potted roses and roses that are going into winter unhealthy. A weakened rose may not survive the winter without protection. Newly planted roses or one year old plants need protection. For all the roses just mentioned, mulch up to 12” at the base of the plant. The roses that are winter hardy and need no protection are Own Root, Buck, EZElegant and OGR, or old garden roses.
Where a rose is planted also determines if it needs protection. For example, a rose will need more protection if it is located in a low spot in your yard or garden, or if it is in a place where it will get lots of wind. Wind dries out roses.. Roses planted next to the house may not need protection. As you survey your roses and their various locations, you will be the one to judge if they need protection or not. Well, winter has come! How and when do we winterize our roses? This is the question on everyone’s minds. The following points are how we prepare our roses for winter: 1. Stop fertilizing six weeks prior to the first frost in your area. You can look this up on Google or in the Farmer’s Almanac. 2. Do not use slow release fertilizer from late summer on. 3. Stop deadheading roses for the six weeks prior to the first frost. Leaving spent roses on the bush over winter actually feeds the rose.4. If you follow a spray schedule, continue spraying until the first frost. This applies to both organic and synthetic sprays. If you have had issues with disease or pests, one last spray will help the rose to be healthy heading into winter. 5. Keep watering as necessary. 6. Wait to do fall pruning of long canes until after the rose shuts down. This would mean two nights of temperatures in the mid 20’s. If this has not happened yet in your area, it very well might this next week. 7. Apply winterization after two nights of 20 degrees. If this is applied too soon, it may cause fungus diseases to activate again. The reason to winterize, which may surprise some, is to keep the soil from going cold to warm and back and forth. Keeping the roots stabilized is the point. And 8. IF you have had problems with gophers, moles, voles, mice, etc., now is the time to treat the surrounding soil, tunnels, holes, etc with a pesticide. Motomco (purchased on Gemplers.com), or castor oil are two recommendations to help with this. 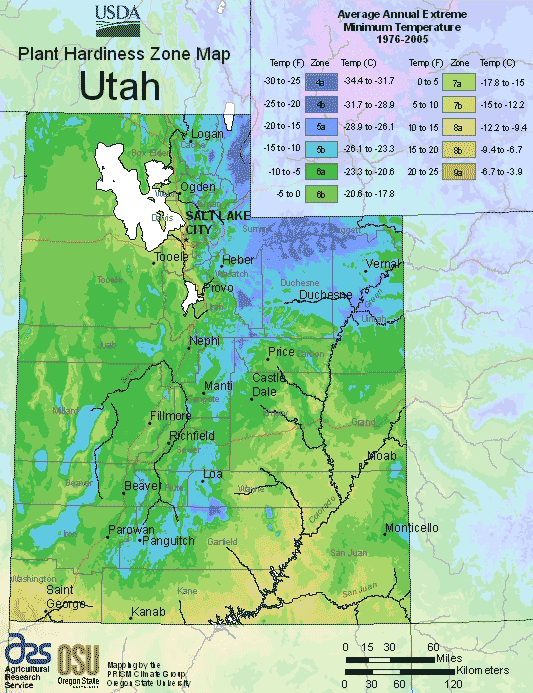 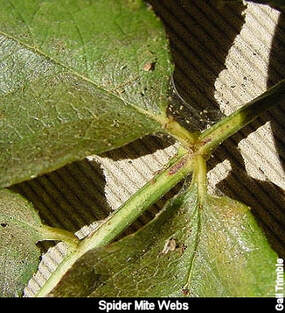 Spider Mites are not insects but minute arachnid relatives of spiders that live on the underside of rose foliage. The first sign of spider mites will be a lightening of the lowest foliage as the mites suck the sap from the leaves and other tender parts and can eventually defoliate the plant. You may also see many little webs (webbing) and eggs on the underside of the leaves. You can check for spider mites with a sheet of white paper. Shake damaged leaves over the paper in the sun. If tiny, rusty dots start to move, you have spider mites.
Controlling spider mites with chemicals can be used, but there are two alternative methods. The first choice is to select rose cultivars that have good spider mite resistance. Second, you can use a water wand with a rose-head attachment (like a showerhead) to wash off the underside of the rose foliage every one or two days until there is no problem. It works, so be sure to try it for at least a couple of weeks before selecting spider mite chemicals, which are the third option. There are several miticides available, some more effective than others. Miticides that do not kill the spider mite eggs must be sprayed at frequent intervals for three weeks to eliminate the mature and hatching mites. Eggs will hatch in two to three days at 75 degrees and above. Insecticidal soap and insecticidal oils also work for the control of spider mites. Remove the affected foliage before spraying and direct the spray material to the underside of the foliage. Mites can become resistant to a chemical, and it may be necessary to change miticides from time totime. Spraying before winter protection is advisable as mites winter over in sheltered spots in the garden. Because insecticides used for other rose pests also kill the natural enemies of spider mites, diminish the use of broad-spectrum insecticides and only spray insecticides when necessary. 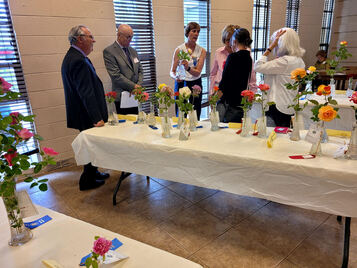 The annual Utah Rose Society rose show offers rose lovers the opportunity to display their
home-grown roses to the public. In the Rose Show Schedule you will find 4 Divisions of competition that will allow you to be creative in the way that you show your roses. Division I is “Special Challenge & Collection Classes” and contains 13 classes
The following posts continue with other Divisions in the annual Rose Show. |

The Rosette
The Official Blog of the |
|
|
Copyright 2024
Utah Rose Society |